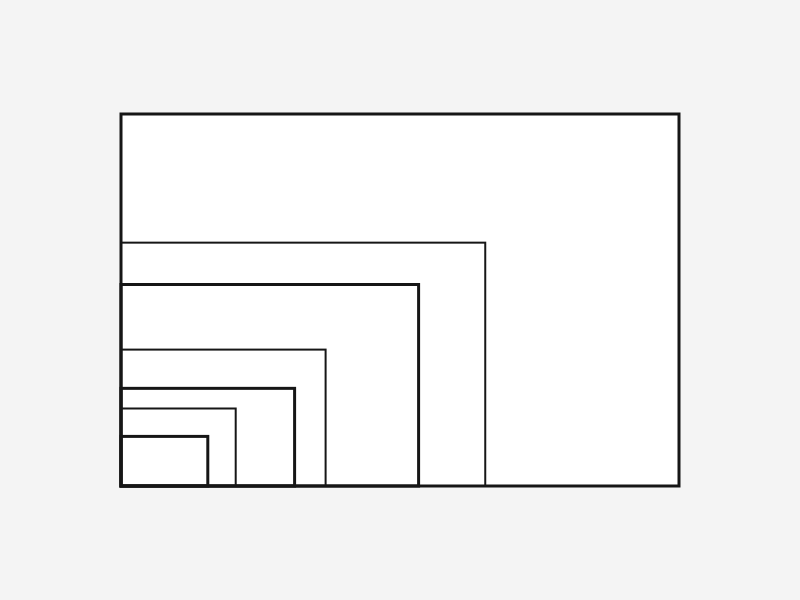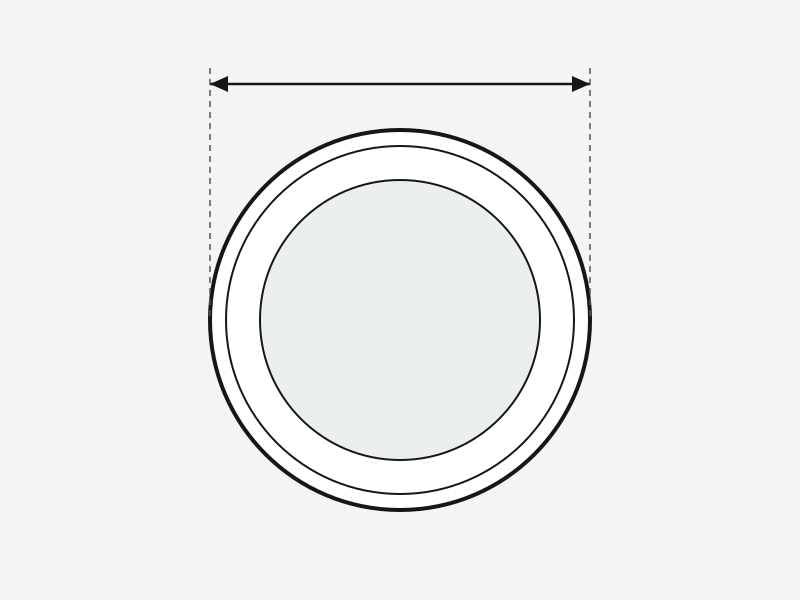
An astronomy camera’s spec sheet lists a dozen numbers, from sensor format to back focus. This guide explains what each one means and when it matters. Most matter less than they look. The one that matters most, pixel size, depends as much on your telescope and your sky as on the camera.
The short answer: pixel size matters most. Together with your telescope’s focal length, it sets how much sky each pixel sees, and that should suit how steady your sky is. After that, read noise and quantum efficiency decide how faint you can go. The other specs decide what the camera fits and how quickly it works.
Each section below says what the spec means, the values you’ll typically see, and who it matters to. We’ll go into each one in more depth in its own guide.
Last checked 18 October 2026. Typical values are from manufacturers’ data for current astrophotography cameras.
A pixel is a bucket in the rain
Most of these specs describe a pixel, and a pixel works like a bucket left out in the rain. Light arrives as photons, like raindrops. A pixel turns each photon it catches into an electron and stores the charge. At the end of the exposure, the camera measures how much charge each pixel holds.
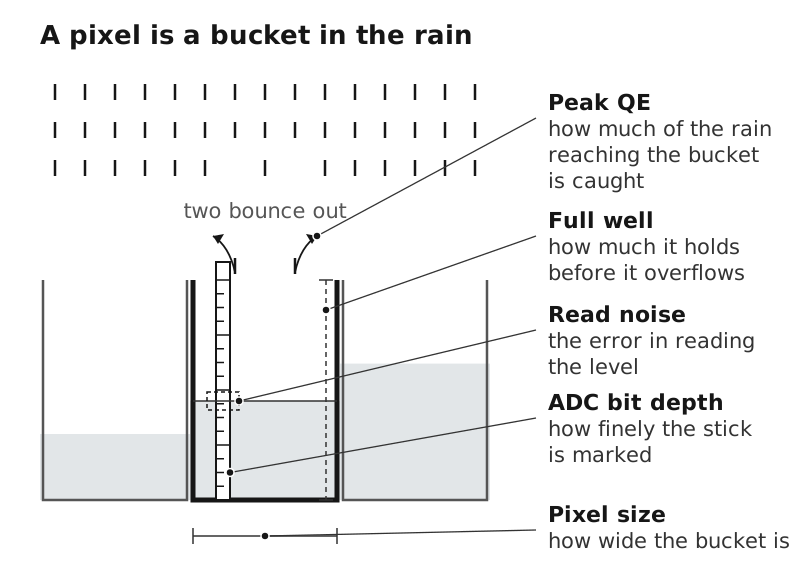
- Pixel size is how wide the bucket is. A wider bucket catches more rain, and usually holds more.
- Peak QE is how much of the rain reaching the bucket is caught.
- Full well is how much the bucket holds before it overflows and the level stops rising.
- Read noise is the error in reading the level.
- ADC bit depth is how finely the measuring stick is marked.
Sensor format, size and diagonal
Sensor format is the name of a sensor’s size class, such as 1-inch, APS-C or full frame. Sensor size is its real width and height in millimetres, and the diagonal is the distance from corner to corner.
Here is how the sensor specifications for a 1-inch sensor might appear on a spec sheet or website:
| Spec | Value |
|---|---|
| Sensor format | 1″ |
| Sensor size | 13.2 × 8.8 mm |
| Diagonal | 15.9 mm |
| Resolution | 5440 × 3648 px |
| Megapixels | 20 MP |
| Pixel size | 2.4 µm |
And here is the same sensor, drawn from those figures:
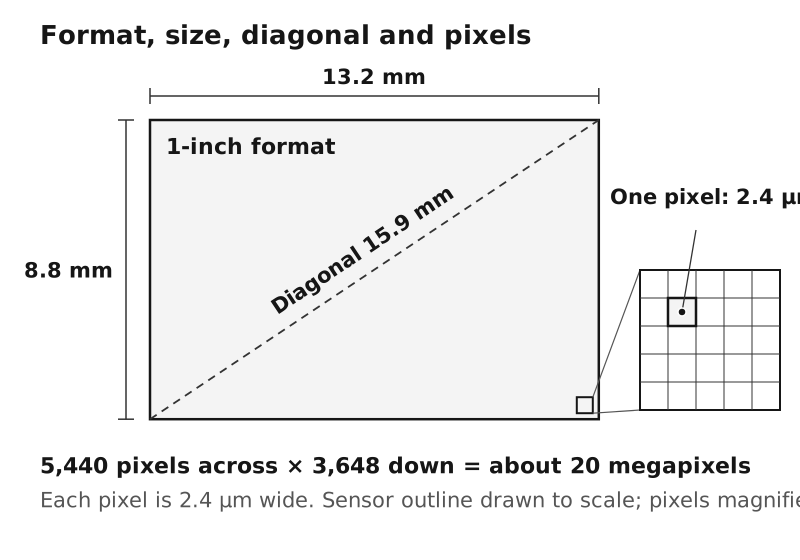
The format names aren’t measurements: a “1-inch” sensor is 15.9 mm across the diagonal, well short of an inch. Our sensor sizes guide explains why. Astrophotography sensors typically range from about 6 mm to 43 mm across the diagonal.
When it matters: the sensor size sets how much sky you see. Larger sensors need a larger image circle from the telescope. That means a sharp, evenly lit field at least as wide as the diagonal, or the corners suffer. They also need larger filters.
Resolution, megapixels and pixel size
Resolution is the number of pixels across and down the sensor: 5440 × 3648 in the example above. Multiply the two together and you get the total number of pixels on the sensor. Megapixels give that total in millions: here about 20 MP. Pixel size is the width of one pixel in micrometres (µm). In astrophotography cameras it typically ranges from about 1.5 µm to 9 µm.
Pixel size is the one to look at. With your focal length, it sets how much sky each pixel sees, called the image scale:
Image scale (arcseconds per pixel) = 206 × pixel size (µm) ÷ focal length (mm)
For example, 3.76 µm pixels on a 500 mm telescope give about 1.55 arcseconds per pixel.
The right image scale depends on your seeing: how much the atmosphere blurs the stars. Seeing is measured as the width of a star image. Your capture software can report it, often as FWHM: the full width at half maximum. Around 2 arcseconds is a steady night for most observers, and 3 or more is poor. To record all the detail the seeing allows, a star needs to span about two to three pixels. So divide your typical seeing by 2 to 3: 2 to 3 arcseconds of seeing suits about 0.7 to 1.5 arcseconds per pixel. Finer than that adds no detail; it spreads the same light over more pixels, so each one is noisier.
When it matters: always. For planets, the usual rule is an f-ratio of about five times the pixel size, often reached with a Barlow lens. For 3 µm pixels that means about f/15. Megapixels alone tell you little: on the same size of sensor, more megapixels means smaller pixels.
Colour or mono: the Bayer matrix
A colour sensor has a grid of tiny red, green and blue filters over its pixels, called a Bayer matrix. It repeats in blocks of four pixels: one red, two green and one blue. Each pixel records only its own colour.
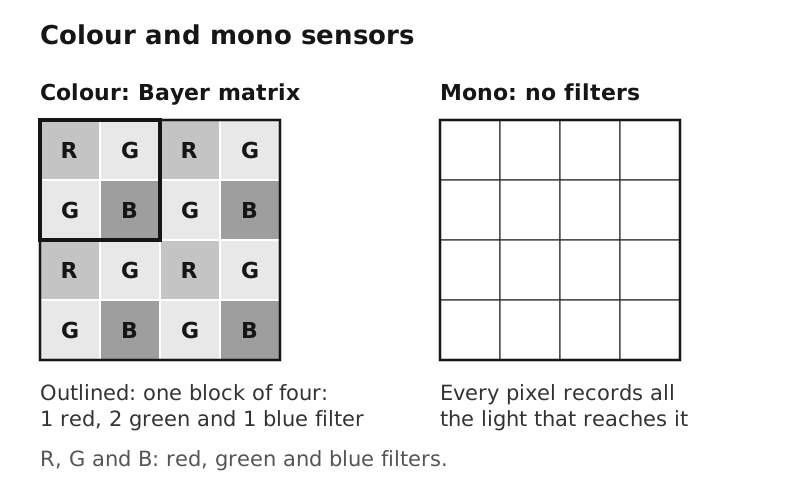
Astronomy cameras send this raw data as it is, with one value per pixel. So a raw frame from a colour camera is the same size as one from a mono camera. Your capture or processing software then makes the colour picture, estimating the two missing colours at every pixel from its neighbours. This is called debayering.
A mono sensor has no filter matrix, so every pixel records all the light that reaches it. For colour from a mono camera, you take separate exposures through red, green and blue filters, or narrowband filters, and combine them.
When it matters: a colour camera gives a colour image in one exposure, which is simpler. A mono camera is more sensitive and gets the most from narrowband filters. A hydrogen-alpha filter passes only deep red light. Behind one, a colour sensor records the light mainly on its red pixels: one in every four. A mono sensor records it on every pixel, so it collects more signal and finer detail.
Shutter: rolling or global
The shutter is electronic, and it comes in two kinds. A global shutter collects light on every pixel over exactly the same moment. A rolling shutter starts and ends each row’s exposure a fraction later than the row above, working down the sensor.
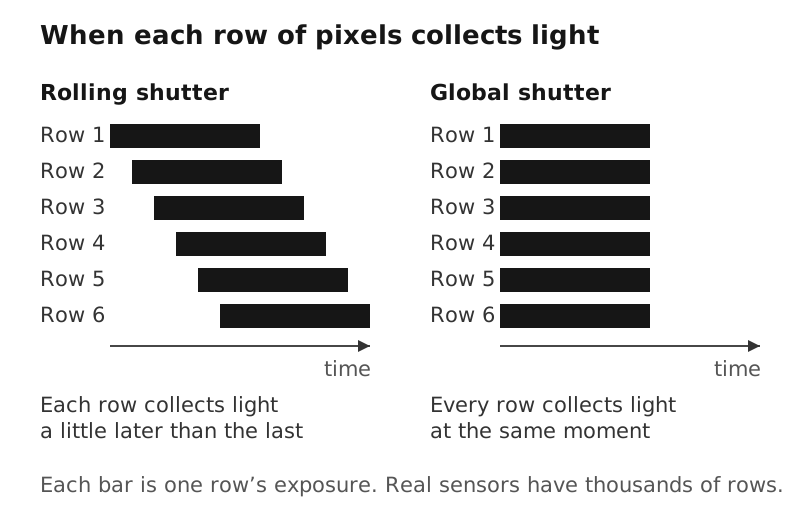
A rolling shutter can skew something that moves quickly during the readout. A global shutter avoids that, but at a cost. It ends every pixel’s exposure at the same instant, yet it can still only read the rows out one at a time. So each pixel needs a small store beside it to hold its charge until its row is read. That store takes up room in the pixel, which usually means a smaller full well and more read noise. Most astronomy sensors use a rolling shutter.
It is often suggested that a global shutter freezes the atmosphere’s ripples better for planetary imaging. Experienced planetary imagers report no clear difference in practice. The rows covering a planet are read in a few thousandths of a second. Stacking software also corrects the distortion in small patches across each frame.
When it matters: rarely for deep sky, and seldom for planets. A global shutter helps with fast-moving subjects such as satellites, and with precise timing, such as recording a star blinking out behind an asteroid.
ADC bit depth
The ADC, or analogue-to-digital converter, measures each pixel’s charge and turns it into a number. Its bit depth sets how many numbers it can give:
- 12-bit: 4,096 levels
- 14-bit: 16,384 levels
- 16-bit: 65,536 levels
More levels mean finer steps between faint shades. That matters when an image is stretched: brightening the faint parts much more than the bright parts to bring out a nebula. A deep-sky frame’s background sits close to zero, so a strong stretch spreads a few levels across most of the picture. With too few levels, smooth gradients turn into visible bands.
Stacking many frames fills in the steps. Each frame’s reading carries a little random noise, so the same faint shade lands sometimes on one level and sometimes on the next. Averaged over many frames, the result settles between the two. Each extra bit of precision needs about four times as many frames, as long as the noise is at least about one step.
When it matters: for deep sky with long exposures and few frames, 14 or 16 bits help. Planetary images need far less stretching, because the planet itself is bright: experienced imagers expose Jupiter to fill 80 to 90% of the histogram. Planetary processing is mostly sharpening, and you stack thousands of frames, so 12 bits are plenty. Many planetary cameras can also capture in 8-bit, which gives higher frame rates and smaller files.
Full well
Full well is the most charge a pixel can hold before it is full. It is given in thousands of electrons (ke⁻): 51 ke⁻ means about 51,000 electrons. In astrophotography cameras it typically ranges from about 6 to 100 ke⁻.
Once a pixel is full it overflows, and its reading stops rising. Bright star cores turn into flat white discs and lose their colour. This is called saturation. Larger pixels usually hold more charge.
The figure is quoted at the camera’s lowest gain. Gain amplifies each pixel’s signal before the ADC measures it. Turn the gain up and each electron gives a bigger reading, so the ADC reaches its top number with fewer electrons in the pixel. A 12-bit ADC, set so that each electron adds one step, tops out at about 4,096 electrons, even if the pixel could hold 50,000.
When it matters: for bright stars in long exposures. It matters less than it used to, because low-noise sensors let you take many shorter exposures and stack them. For planets, the Moon and the Sun, it rarely matters.
Read noise
Read noise is the small, random error added each time the camera reads a frame out, measured in electrons (e⁻). It can push a reading either up or down, by a different amount each time. In a very dark pixel, a downward push could take the reading below zero, which the camera can’t record. So cameras add a small fixed amount to every reading, called the offset, to keep readings above zero.
Read noise is the same for a 1-second exposure as for a 10-minute one. It isn’t the same as dark current, which is charge made by heat in the sensor and builds up through the exposure. Cooling reduces dark current, but barely touches read noise.
Read noise is highest at low gain and falls as the gain is raised. Spec sheets often show it as a range, such as 7.2–0.7 e⁻. The first figure is at the lowest gain and the second at the highest. Many modern sensors also switch to a low-noise mode at a set gain, called HCG (high conversion gain). Most current sensors reach 1.5 e⁻ or less at high gain.
When it matters: for anything made of many short exposures. With lower read noise, short exposures stack as well as long ones. Robin Glover, author of the SharpCap capture program, gives a worked example. Under the same sky, cutting read noise from 6.5 to 1.5 e⁻ shortened the suggested exposure from about 3,200 s to 170 s.
Peak QE
QE, or quantum efficiency, is the proportion of the photons arriving at a pixel that are stored as signal. A QE of 80% means 80 photons counted out of every 100. Peak QE is the figure at the sensor’s best colour, usually blue-green. Makers typically list between about 75% and 92%. A figure such as “>80” means the maker quotes “over 80%”.
QE changes with the colour of light, which is measured as wavelength in nanometres (nm). Laboratory tests of one modern sensor measured about 80% in blue light at 475 nm. At 656 nm, the deep red of hydrogen-alpha (H-alpha) from nebulae, it counted about half. In near-infrared at 900 nm, it counted 10%.
Treat peak QE as approximate. The industry’s camera test standard, EMVA 1288, notes that a few percent between data sheets isn’t significant. Colour sensors score lower than mono, because each pixel sits under a coloured filter.
When it matters: for narrowband imaging, look at the maker’s QE curve at your filter’s wavelength, not the peak. For planets through an infrared filter, look at the near-infrared part of the curve.
Image buffer
The image buffer is memory inside the camera, typically 256 or 512 MB. It holds frames until the computer collects them. If the USB link or the computer pauses for a moment, frames wait in the buffer instead of being lost. It doesn’t raise the camera’s top frame rate.
Frames fill memory quickly. A 16-bit frame takes two bytes per pixel:
| Frame | Size | Frames in 256 MB |
|---|---|---|
| 640 × 480 pixels, 8-bit (a planet) | 0.3 MB | About 830 |
| 8.3 MP, 16-bit | 16.6 MB | 15 |
| 26 MP, 16-bit | 52 MB | 4 |
These sizes are the same for colour and mono cameras, because both send raw frames with one value per pixel (see the Bayer matrix).
When it matters: for planets, the Moon and the Sun, where you record dozens or hundreds of frames a second. It helps most with a slow laptop. For deep sky, with a few frames a minute, it hardly matters.
Back focus
Back focus is the distance from the camera’s front face to the sensor inside it. Astrophotography cameras typically have 7.5 to 17.5 mm. Some quote two figures, with and without a tilt plate fitted.
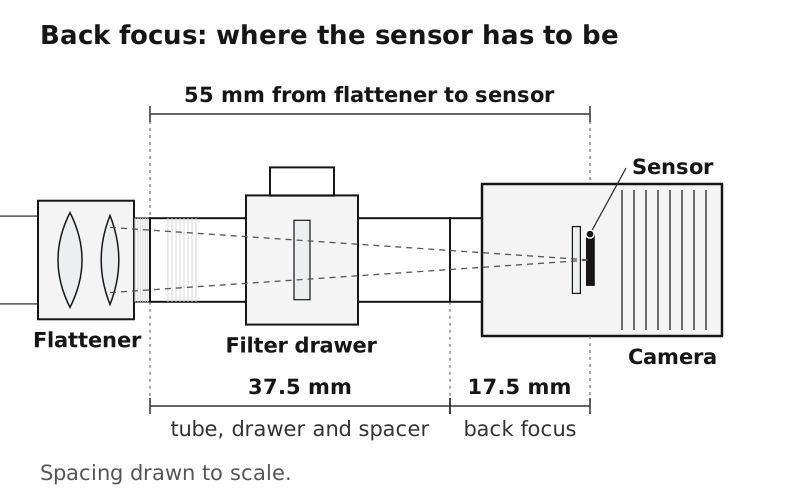
It matters because field flatteners and reducers need the sensor at a set distance behind them, usually 55 mm. Get it wrong and stars near the edges are distorted. The 55 mm standard comes from DSLRs, which sit 55 mm back on their T-ring adapters. With a camera of 17.5 mm back focus, spacers and filter holders make up the other 37.5 mm.
When it matters: whenever you use a flattener, reducer or coma corrector, which is most deep-sky imaging. For planets with a Barlow lens, the camera only needs to reach focus.
Which specs matter for what you image
| Spec | Planets, Moon and Sun | Deep sky | Why |
|---|---|---|---|
| Pixel size | Key | Key | Must suit your focal length and seeing |
| Read noise | Key | Useful | Sets how short exposures can be |
| Sensor format | Minor | Key | Sets your field of view |
| Colour or mono | Useful | Key | Mono gets the most from filters |
| Back focus | Minor | Key | Flatteners need the right spacing |
| Peak QE | Useful | Useful | Check the curve at your filter |
| Image buffer | Useful | Minor | Stops dropped frames at speed |
| Full well | Minor | Useful | Bright stars in long exposures |
| ADC bit depth | Minor | Useful | Long exposures with few frames |
| Shutter | Minor | Minor | Global for timing and fast movers |
Questions
What pixel size do I need for my telescope?
Work out the image scale: 206 × pixel size in µm ÷ focal length in mm. Then compare it with your seeing: a star should span about two to three pixels. In 2 to 3 arcseconds of seeing, that means about 0.7 to 1.5 arcseconds per pixel.
What is a good read noise for astrophotography?
Most current astronomy sensors reach 1.5 e⁻ or less at high gain, and some go below 0.5 e⁻. Lower is better for planets and short exposures. Read noise is added once per frame, whatever the exposure length.
What is full well capacity?
The most charge a pixel can hold before it saturates, given in electrons. A full well of 51 ke⁻ means about 51,000 electrons. Beyond it, bright star cores turn flat white and lose their colour.
Is a 16-bit camera better than a 12-bit one?
For long deep-sky exposures that will be stretched hard, 16 bits give finer steps between faint shades. For planets and short stacked exposures, 12 bits are enough, because stacking fills in the steps.
What does peak QE mean?
The proportion of the photons arriving at a pixel that are stored as signal, at the sensor’s best wavelength, usually blue-green. A peak QE of 80% means 80 photons in 100. QE is lower in deep red and near-infrared light, so check the curve for narrowband work.
What is a Bayer matrix?
The grid of red, green and blue filters over a colour sensor’s pixels, in blocks of one red, two green and one blue. Each pixel records one colour, and software on your computer fills in the other two.
What is 55 mm back focus?
The distance most field flatteners and reducers need between their rear and the sensor. It matches a DSLR on a T-ring. Astronomy cameras typically have their sensors 7.5 to 17.5 mm behind the front face, and spacers make up the rest.
Does a global shutter help with planetary imaging?
Not noticeably, according to experienced planetary imagers. A global shutter helps with fast-moving subjects and precise timing. For deep sky and planets, a rolling shutter is fine and usually has lower noise.
Sources
- The camera model, QE and gain: European Machine Vision Association, EMVA 1288 Release 3.1.
- Read noise, dark current and shot noise: Teledyne Photometrics, Scientific camera noise sources and Dark current.
- Read noise falling as gain rises: Teledyne Photometrics, New era in dynamic range and linearity for scientific CMOS cameras.
- Read noise above and below the baseline, and offset: Tucsen, What is offset in a scientific camera?
- Full well and saturation: Andor, Dynamic range and full well capacity.
- Bit depth and grey levels: Teledyne Photometrics, Bit depth, full well and dynamic range.
- Averaging noisy readings to gain precision: Silicon Labs, AN118: Improving ADC resolution by oversampling and averaging.
- Stretching deep-sky images: Siril, Image stretching. Planetary exposure and processing: Christopher Go, presentation for NASA’s Juno mission.
- Measured QE of a modern astronomy sensor: Alarcon et al., Scientific CMOS sensors in astronomy: IMX455 and IMX411, Publications of the Astronomical Society of the Pacific, 2023.
- The Bayer matrix: Bayer filter. Raw colour frames and debayering in software: Robin Glover and others, SharpCap forum.
- Rolling and global shutters: Teledyne Photometrics, Rolling vs global shutter. Global shutters for planets: Cloudy Nights discussion among experienced planetary imagers.
- Seeing and sampling: Richard Wright, How to capture the clearest astro images, Sky & Telescope. Planetary f-ratio: British Astronomical Association, High-resolution imaging of Jupiter (2025).
- Sub-exposure length and read noise: Robin Glover, SharpCap forum.
- The 55 mm back focus standard: ZWO, ASI camera 55 mm back focus solution (2025).
- Typical values: manufacturers’ published data for current astrophotography cameras, checked October 2026.
Diagrams are our own. Questions about any of these specs? Call 01743 224 180 or send us a message.