Back to
Beginner Telescopes

Mercury 707

A classic long-tube beginner refractor, the Sky-Watcher Mercury 707 offers crisp views of the Moon, planets and bright deep-sky objects on a simple up/down/left/right mount that’s easy to learn. Lightweight, full-height and quick to set up, it’s a great first “proper” telescope for older kids, families and adults who want a real scope that still feels friendly to use.

£115.00

Availability
Item is usually in stock.

UK Support

Speak to a real person by phone, email, or chat

We handle warranty

We liaise with the manufacturer—no overseas chasing

Easy Returns

Something wrong? Retun your item hastle free

What is the Mercury 707?

The Mercury 707 is a classic beginner’s refractor telescope designed for families, older children and adults who want a “proper-looking” telescope on a tripod without getting too technical. With a 70 mm lens and a straightforward alt-azimuth mount, it’s aimed at people who mainly want to enjoy the Moon, planets and brighter deep-sky objects from the garden or on holiday, rather than spend ages learning complex controls.

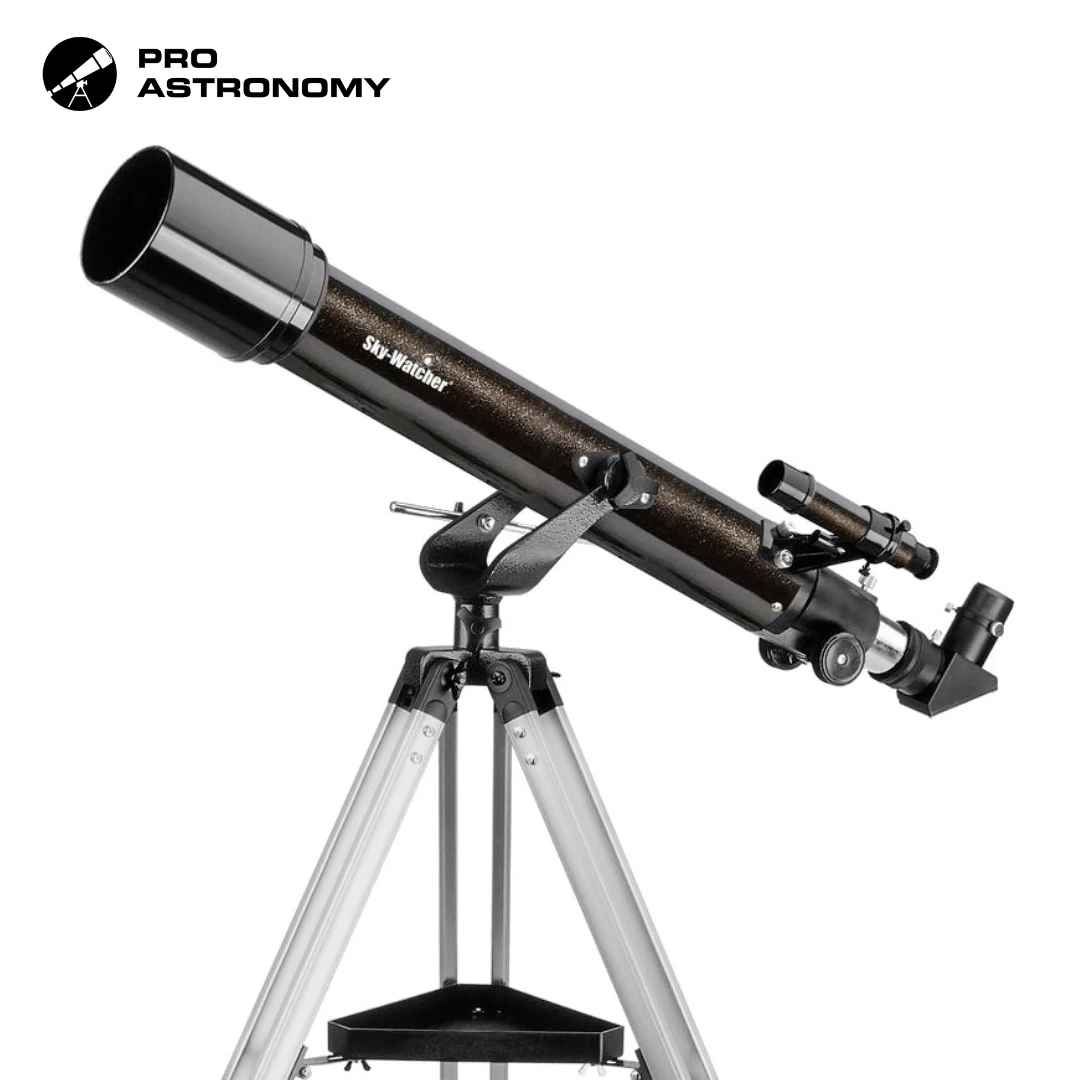
Unlike toy scopes, the Mercury 707 uses real astronomical optics and a full-height tripod, so it feels like serious equipment while still being friendly for first-timers. It’s a great option if you’re buying for a child who’s outgrown the plastic beginner telescopes, or for someone who’s always fancied a telescope but doesn’t want a huge, heavy setup taking over the house. As a birthday or Christmas present it looks the part, is easy to wrap, and delivers views that will keep new observers interested.

Size, Shape & What to Expect

The Mercury 707 is a slim, long-tube refractor that sits on a lightweight metal tripod. Visually, it’s the archetypal “pirate with a telescope” shape – a straight tube with the eyepiece at the back, so most people instinctively know how to use it. The tripod extends to a comfortable standing height for adults and can be lowered for younger observers; once set up, you can leave it assembled and simply carry it out into the garden in one piece.

The mount is an alt-azimuth design, which means it moves up/down and left/right like a camera on a photo tripod. This makes it easy to aim: you just loosen the controls, point at the Moon or a bright planet, and gently nudge to track as the sky drifts. There’s no polar alignment or counterweights to worry about, so the learning curve is pleasantly shallow.

At the eyepiece, you can expect crisp views of the Moon with plenty of detail, recognisable disks of Jupiter and Saturn (with Saturn’s rings clearly separated from the planet in steady conditions), and pleasing views of bright star clusters and nebulae under darker skies. The 70 mm aperture isn’t huge, but it’s a solid step up from entry-level toy instruments and a good balance between performance, weight and price. Overall, the Mercury 707 is a practical, easy-to-live-with starter telescope that looks like the real thing and rewards regular, casual observing.

Why buy from Pro Astronomy?

Parent-friendly expertise
We specialise in helping families choose their first astronomy kit, so you’ll always get clear, jargon-free guidance. Whether it’s a birthday surprise or their first Christmas telescope, we’ll help you pick something your child will genuinely enjoy.

Curated for beginners
Every product we stock is hand-selected for real-world ease of use. No confusing gear, no unnecessary upsells — just reliable, fun, confidence-building equipment that works for young stargazers.

UK-based support
Got a question about assembly, using eyepieces, or what your child can see in the sky? Our UK team is here to help with practical, friendly advice.

Tested and trusted
We thoroughly check the products we sell, focusing on build quality, simplicity and durability — exactly what you need for a child-friendly telescope or science gift.

Helpful learning resources
Alongside your purchase, you get access to our growing Learn section, packed with plain-English guides, beginner tips and activity ideas you can share with your child.

UK Support

Speak to a real person by phone, email, or chat

We handle warranty

We liaise with the manufacturer—no overseas chasing

Custom packages

Bundle the right parts for your rig—tailored pricing available

Easy Returns

Something wrong? Retun your item hastle free

FAQs

Q: Is the Mercury 707 suitable for children and complete beginners?
A: Yes – it’s sold as a beginner’s telescope and is a good fit for older children, teens and adults taking their first steps into astronomy. The simple alt-azimuth mount means you just move it up/down and left/right, and there’s no polar alignment to worry about. Younger kids will still need an adult to help with setup and aiming, but it’s much less intimidating than an equatorial-mounted scope.


Q: What will I actually be able to see with the Mercury 707?
A: From a typical garden you can expect very nice views of the Moon with plenty of crater detail, Jupiter and its moons, Saturn and its rings, plus bright star clusters and some nebulae under darker skies. It’s not powerful enough for serious faint-galaxy hunting, but it’s a solid all-rounder for the “big name” objects new observers want to see first.


Q: Can I use the Mercury 707 in the daytime for nature and landscape viewing?
A: Yes. As a 70 mm f/10 refractor with an erect-image diagonal, it can double as a spotting scope for birdwatching, wildlife and distant scenery as well as night-time astronomy. Many owners use it as a general-purpose scope they can take on holiday for both daytime and night-time use.


Q: Is the Mercury 707 any good for astrophotography?
A: It’s not designed for long-exposure deep-sky imaging – the mount and optics are aimed at visual observing – but you can grab fun snapshots of the Moon and bright planets using a smartphone adapter held over the eyepiece. Some people also repurpose the 70/700 OTA later as a small guidescope or casual imaging lens, but if serious astrophotography is your goal, you’ll want to upgrade to a heavier mount and more specialised telescope eventually.


Q: Does it come with everything I need to get started, and what accessories are worth adding?
A: Out of the box you get the 70 mm telescope tube, alt-az mount, full-height aluminium tripod, 25 mm and 10 mm eyepieces, 2× Barlow lens, 6×24 finderscope, star diagonal and accessory tray – so you can start observing straight away. Many retailers suggest adding a neutral-density Moon filter for more comfortable lunar viewing, a simple star guide or planisphere, and a smartphone adapter if you’d like to take pictures through the eyepiece.

Setup

1. Unbox and check the parts

Lay everything out on a table and make sure you have:

  • Mercury 707 telescope tube

  • Alt-azimuth mount and aluminium tripod

  • Accessory tray

  • 25 mm and 10 mm 1.25″ eyepieces

  • 2× Barlow lens

  • 6×24 finderscope (with bracket)

  • 1.25″ star diagonal

  • Any manuals/leaflets

Don’t worry if it looks like a lot of bits – you’ll only use a few at once.


2. Assemble the tripod and mount

  1. Unfold the tripod legs and stand it upright.

  2. Adjust the legs so the tripod is roughly level and at a comfortable height.

  3. Fit the accessory tray between the legs (usually it clips or screws into place). This stiffens the tripod and gives you somewhere to put eyepieces.

  4. Make sure all leg clamps and screws are snug, not loose.

The alt-azimuth mount head should already be attached to the top of the tripod or supplied ready to bolt on – it’s the part the telescope tube sits on.


3. Attach the telescope tube

  1. Place the telescope tube into the tube rings or mounting clamp on the alt-az head.

  2. Tighten the screws gently so the tube is secure but not crushed.

  3. Check you can move the telescope up/down and left/right smoothly. If it’s too stiff or too loose, tweak the tension knobs until it feels controlled but easy to nudge.


4. Fit the finderscope

The finderscope is the little “mini telescope” that helps you aim the main tube.

  1. Slide the 6×24 finderscope into its bracket on the main tube.

  2. Secure it with the small thumbscrews.

  3. For now, just make sure it’s pointing roughly the same way as the main telescope – you’ll align it properly in the next step.


5. Insert the star diagonal and eyepiece

  1. Remove the dust cap from the focuser at the back of the telescope.

  2. Insert the star diagonal into the focuser and gently tighten the thumbscrew.

  3. Take the 25 mm eyepiece (the lower-power, wider-view eyepiece) and push it into the diagonal.

  4. Tighten the diagonal’s thumbscrew to hold the eyepiece in place.

Starting with the 25 mm eyepiece makes it much easier to find things.


6. Daytime practice & aligning the finderscope

Before your first night, do a quick test in daylight:

  1. Set the telescope up near a window or in the garden.

  2. Point it towards a distant object (a chimney, TV aerial or tree).

  3. Look through the 25 mm eyepiece and use the slow up/down/left/right movements to centre that object.

  4. Now look through the finderscope.

    • Use the adjustment screws on the finder bracket to move the crosshairs so they line up with the same object centred in the main telescope.

  5. Once that’s done, whatever you centre in the finderscope will also be in the main eyepiece – this makes night-time aiming much easier.


7. First night under the stars

  1. Take the telescope outside 15–20 minutes before observing so it can cool to outdoor temperature.

  2. Choose a solid patch of ground and spread the tripod legs for stability.

  3. Remove the main dust cap and the caps from the diagonal/eyepiece.

  4. Start with an easy target – the Moon if it’s visible, or a bright star/planet if not.

  5. Look through the finderscope and centre the target using the up/down and left/right motions of the mount.

  6. Then look in the 25 mm eyepiece and gently adjust the telescope until the object is centred and sharp. Use the focuser to bring it into focus.

Take your time and let everyone have a look – the first “wow” is worth it.


8. Changing magnification

Once you’re comfortable:

  • Swap the 25 mm eyepiece for the 10 mm to increase magnification for closer views of the Moon and planets.

  • For even more power, you can introduce the 2× Barlow lens:

    1. Remove the eyepiece from the diagonal.

    2. Insert the Barlow into the diagonal.

    3. Put the eyepiece into the Barlow.

Higher magnification is great for the Moon and planets, but it also makes everything dimmer and harder to keep centred, so use it in good conditions and with a gentle touch.


9. After observing – packing away

  1. Replace the dust caps on the front lens, diagonal and eyepieces.

  2. Bring the telescope back indoors once there’s no dew on it; avoid touching any glass surfaces.

  3. You can store the scope fully assembled in a corner of a room or gently collapse the tripod legs if you need it more compact.

Keep the lens and optics capped and dry, and the Mercury 707 will be ready for the next clear night.

Not Convinced?

Still not sure this device is for you? Use the contact details and we can help make sure you choose the perfect system for your budget and setup.

Thanks,
Pro Astronomy

+44 (0)1743 224 180